My finished music video:

My front digipak panel:

My front digipak panel:
Right-click the image and open it in a new tab for a bigger version.

My inside digipak panels:

My inside digipak panels:
Right-click the image and open it in a new tab for a bigger version.

My back digipak panel (with album spine:)

My back digipak panel (with album spine:)
Right-click the image and open it in a new tab for a bigger version.

Click the image below to open my website in a new tab:

Friday 22 December 2017

Construction Post 6: Editing the website

The third and final product of the construction phase would be the website. Jack was leading this project- as with the other stages, the leader did the majority of the basic work with lots of input from the other two group members, who also helped out. In this case me and Noa were the helpers, and we helped not only by doing some website editing, but also by creating various elements for the website, especially in the final week when we had both mostly finished off our products and Jack needed an extra boost from us. The website was built using Wix, an online website creation software with the ability to edit your website and then publish it live, with Photoshop used to create various images to be used to actually build the site within the browser. Website editing consisted of creating various pages and website elements, and linking them all together. We have a pop-up, a home-page, and a few supplementary pages that can be accessed from the relevant sections of the main page- for example, clicking the competition image takes the viewer to the special competition page. The home page is built of lots of small sections, including one for the debut video, one for the album, one for the gallery, one for the merchandise shop, and so on.
Wix is an all-in-one website creation tool, accessed through their website and used inside the browser rather than being downloaded and launched from the system files like the other programs we used throughout this project. This was a change for us, but one we quickly adapted to, especially because of the many benefits of being online- you could see what your website was going to look like because you were already viewing it in a browser, for example, and you could publish it at any time. Click to enlarge.
Photoshop CS5 had been a very important tool to us throughout this entire project. It was the only software used for the digipak, went beyond its standard uses of image editing to aid in video editing and animation for the music viceo, and for the website it helped us create virtually every element of all the pages. Click to enlarge.

Our Challenges

A few problems came up during this stage. The main one was the sheer number of images needed on top of the actual framework of the website- the video, for example, had all the footage already available, and the digipak required image editing but also had the basic template already in place. Thus we had to manage time well to have enough for all three projects, with Jack trying to stay ahead to save us time (which he did well) and Noa and I trying to not neglect our own products while aiding Jack (which we managed to do.) Breaking up the work over the multiple weeks we had, and Jack assigning us things to make for him so he could focus on other stuff and know he would have access to another image later on without having to work on it himself or worry, both really helped us overcome this challenge and get all three products done in time.

Another thing we had to contend with was the way Wix works. Sometimes, we had a plan for something, often something quite conventional, but Wix didn't have a one-step tool for it. For example, if we wanted an image to change when the mouse cursor touched it, yet still be a link to somewhere else, we couldn't just use the button tool- we had to make an invisible link box over an image box. Wix is a great website and piece of software, but it came with a learning curve, especially since we hadn't used it in any other projects throughout the years, although we overcame each issue as they came and still managed to have everything the way we originally envisioned it, and we were all quite proficient by the end.

My Contributions

My contributions included making four or five of the merchandise images, making some of the general website pictures, coming up with the idea for a coloured outline to appear around each band member when selected with the cursor, suggesting we move each section of the home page apart more to aid in reading them as separate things, finalising the details of the contest, general work and aiding in decisions and design, and more.
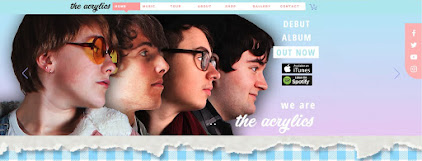
The 'gallery' section of the website. I have scrolled over the image of myself with the mouse cursor (which has disappeared for the screenshot,) revealing the yellow outline and my character's name. The others have not been scrolled over, and thus are just normal images, but they each have their own unique coloured outline and name if selected in the same manner. Click to enlarge.
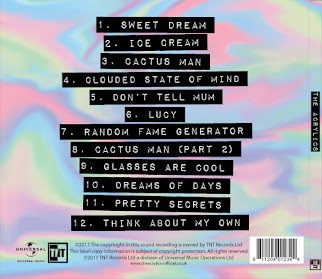
An example of merchandise I created for the online shop. I created each of these separately and saved them as different files, but also made this images with both of them to act as a promo thumbnail image- people will see this in the shop, understand they can purchase an 'Acrylics' branded oyster card holder in multiple colours, and then click the listing and view the individual holder colours through the listing's gallery. Click to enlarge.

Feedback and Changes

We changed the website quite a lot as we progressed, basing the changes on our own adaptations as well as audience feedback, as with the other products. One thing we changed was the obviousness of the contest- an audience member mentioned they wanted to know about it soon after reaching the website instead of having to work more to find it, so we added a link to the contest page to the image gallery at the top of the main page. This solved the problem straight away and ensures people will be more likely to get drawn in quicker.

Another thing we changed was the start screen. We hadn't decided if we were going to have a start screen or a pop-up when we made a flat-plan, as we considered them interchangeable. However, both our target audience and our teachers seemed to agree that a pop-up that doesn't require a change of page is a much better option. Thus, after finding out about this, we added the pop-up.
Our website's pop-up. You can see the 'X' to close it in the corner, and through the semi-transparent background you can see the main homepage- clicking the 'X' simply closes the overlay, and leaves you on this homepage, with no need to redirect to a new webpage. Click to enlarge.
A third change would be the separation of the 'about' and 'gallery' sections. We originally had them be the same thing- clicking the information box about a band member would open their gallery. However, we found some of our audience who we had try out the website missed this too easily, and thus we added a dedicated gallery lower down the page, with a link to it on the navbar, but still left in the links in the 'about' section. Thus, people who want to click the information boxes to see more are accommodated, but people who don't realise that is an option but still want to see images have a clearly signposted gallery to visit.

Our Progress

Overall I think the website was a success. While it ended up taking us the longest out of all three, and we could probably have learned a bit more of Wix on the weekends before the product construction weeks, we still managed to produce a website very much in line with our original ideas, that looks good and is very functional. We used Wix to its fullest extent and produced something we are all proud of.

Construction Post 5: Editing the digipak

The digipak was the second product we needed to create for the project- it is essentially all four sides of our album cover, the two outside and two inside, in one Photoshop document within a special template. Noa lead this project, although me and Jack were constantly giving feedback and suggesting ideas and changes, while helping to make important decisions- we also took over from Noa a few times, and did small but significant amounts of work on top of the majority she did, which were key to its completion by the deadline.

The main tool used for editing the digipak was Photoshop- the template we worked off of was a Photoshop file, and we simply saved a copy of it with our changes as we progressed. We used a few different techniques to create the digipak- we chose studio shots of each of us for the front cover, and opened them in their own documents. Then we trimmed out the background, and used Photoshop's various edge options to smooth out any mistakes. Then we graded each person and put them in. We created various other elements for the digipak, such as ripped paper for the front, a colourful swirling background, and even a whole new set of photos from an extra photoshoot we planned and carried out over a few days to get the inside cover images. We chose various fonts to match the style we wanted, and carried over some of these (along with certain colours and other design choices) to the website. We used Photoshop's layering and masking tools to keep each page of the album cover within its assigned box on the template.
Photoshop CS5 from the Adobe Master Collection suite of software- the template we were given for the digipak was a Photoshop .psd file, which we saved our own copy of. Any extra images we needed were edited in separate Photoshop files and then imported into the main one.

Our Challenges

We came across a fair few challenges while putting together our digipak. One big challenge was the technical difficulties we came across- for some reason, Noa's computer started acting up midway through the process. We tried many different things to get it to stop slowing down, and start responding to key presses and requests to open files, even enlisting the help of the media technician and school IT department. However, we eventually decided to save time and just have Jack and Noa swap computers. As Jack was working inside a browser, he had a lot less problems with the computer, while Noa got to move to a computer without any issues. This was an efficient and effective way of nullifying what could have been a very drawn-out and destructive problem.

Another challenge we faced was how to include the title of the album in a way that didn't obstruct the focal image of the album cover, i.e. the band members, but still made the title very visible. We had planned to put it in the corner above the band members on our flat plan, but actually creating the album and seeing how it worked in real life made us realise we didn't have enough space. Thus, we decided on having the effect of a line of ripped paper at the top, with a smaller one below, and the band members in between. The top line of ripper paper provided a blank space for the title to be centralised and obvious, and the space between the paper retained focus on the band members contained within it. Plus, the paper adds to our DIY aesthetic. We thus adapted to the challenges and changing ideas that arose when we created the digipak.

My Contributions

My contributions to this product include doing some of the basic work when Noa wasn't available and it needed to be done, suggesting various ideas and collaborating on important decisions, having the idea on how to create the colourful swirly background we ended up using, bringing in my camera and a lot of props for the photoshoot for the inside cover (having the inside cover be an interesting spread of items over a table was also my idea back in the planning stages,) suggesting some of the primary colours for the dominant colour scheme across the digipak, and more.
An example of one of the photos we took for the inside covers of the album. I brought in a lot of the photos, as well as the phone, colourful abstract ball, vintage camera, and the camera used to take the photo. Click to enlarge.

Feedback and Changes

As we progressed through the creation of the digipak, we changed our ideas and received lots of feedback, which helped us reach a better final product. One of the first changes of this kind, and one of the biggest, was the move from having the band members go from large to small along the front like the flatplan, to instead having them in a straight line. We did it as the flatplan described at first, but realised something was wrong, yet couldn't think of any interesting alternatives. Audience members pointed out that, instead of what we currently had, just having the same images in a straight line would look quite good. Thus we proceeded with the ripped paper change mentioned above- we only had to create the paper effect, and didn't have to choose and edit different images of the band members. A side effect of these changes was to also make each band member more visible and recognisable through the move from full body longshots to midshots between the paper strips, especially the ones who were on the smaller end on the original design. This ended all our problems with the front cover in one fell swoop.
A segment of our album flatplan, showing the original descending size order, with Casey and Hugh as the two biggest. When we came to create this, multiple people confirmed our fears that the last two band members were too small. Click to enlarge.
Our final album cover, showing everyone in a line. It is still interesting like the flatplan was, but the people are much more recognisable. Click to enlarge.
Another piece of feedback we received from our target audience was to make everything easier to recognise and read. We accomplished this in a few different ways. We found a font for the back cover that included black blocks around the text, which drastically increased readability. We then also upped the brightness and saturation of the inside cover image to make everything stand out more. This both made everything a lot easier to look at, and brought certain elements more in line with the style of the front cover. The audience responded positively to these changes

The final change we made was to make the legal information a lot clearer. We were told by our teachers that important images such as the record label logo as well as the barcode and similar weren't very obvious, and after a few test prints one of the staff noticed that they were outside of the acceptable template borders for the digipak too. Thus we simply responded by re-organising everything, putting a strip of legal information at a good size across the bottom of the back of the album cover, and having all the track names above it. This both eliminated the issue of not having all the legal information in a good format, as well as the sizing issues with the template that might have ruined the final printing.
The back of our album cover, showing both the clear track names in their black blocks, as well as the obvious strip of legal information, including record label logos and barcode, across the bottom. Black and white makes these elements stand out against the colourful background. Click to enlarge.

Our Progress

Overall I think the digipak creation went well. While we could have decided on a better position for the band members before proceeding with the creation of the digipak, and while we could have saved even more time by swapping computers at the first sign of an issue rather than pushing onwards and seeing what happened for a short time, overall we responded to every change we thought we needed to make, and ended up with a good looking digipak which fulfilled everything we wanted and needed it to.

Construction Post 4: Editing the music video

When we moved onto making the three main products of the project for the last few weeks of construction, we decided to assign leadership roles for each one. Jack is most proficient with Wix, having done the most work with it previously and over the last Summer, and thus was given the website. Me and Noa are probably both equally proficient at Premiere and Photoshop- however, I had some ideas for special effects for the video that I already knew how to do (whereas Noa didn't,) and Noa has more knowledge of masks in Photoshop than I do (which are a big part of editing the digipak,) and thus I lead the video editing while she lead the digipak editing. These leadership roles meant we were always making good use of time- if any of us had time allocated to media, we immediately knew which product to default to and work on. The leaders of each project did the majority of the legwork for each aspect, and made smaller decisions as they went along, while all three of us collaborated on the ideas and design and so on for each, and we made important decisions as a group. We did, however, all move around and work on each part of the project though- when someone had a particularly good idea for a product they weren't leading, or when extra work was needed for a certain product to keep it up with the other two, or so we could all learn how to use each program and put our own unique touches on each product, and so on.

As mentioned before, I lead the creation of the music video. Creation of the video was accomplished through the Adobe Master Collection CS5 suite of programs- Premiere for the actual editing, and Photoshop for certain special effects which were then imported into the Premiere video. Having everything laid out in a timeline in Premiere was very beneficial to the process of building up the video alongside the music track, and I learned a lot about the various tools and effects that could be dragged onto clips in the timeline to tweak lighting and add transitions and so on. In Photoshop, I expanded on my knowledge of what Photoshop could be used for- for example, I knew about viewing videos and animations using the 'animation' window and other tools, as well as how to create them using these same tools, but until this project I hadn't actually created any.
Premiere from Adobe Master Collection CS5. The timeline where the clips go stretches across the bottom, the clips and effects are found on the left, and the viewing window is on the right. The center box displays the properties of selected files. Click to enlarge.
Photoshop from Adobe Master Collection CS5. The image is in the center, the tools are to the left, the effects are to the top right, and the layers are on the bottom right. Click to enlarge.

Our Challenges

We hit many challenges throughout the video creation process. One of the biggest and almost constant challenges was fitting in lip-sync across the entire video, while still using a good variety of shots. This necessitated cleverly choosing the right parts from our large range of takes, and fitting them in amongst the narrative shots, to create the kind of video we wanted. As our video is a hybrid of narrative and performance, both sides are equally important, so we had to make sure we had enough lip-sync throughout to balance and tie together the constantly changing narrative. The two best methods I discovered for overcoming this challenge were matching up the audio waveforms from the song and the clip, and cutting on obvious syllables by watching Noa's lips, and then matching that to the same syllable in the song.

Another challenge was how to make the narrative flow alongside the performance. The performance was carried by the progression of the song, but the narrative had to fit in with it and play in between and beside it while still remaining coherent. Different techniques were used- changing between scenes at certain points in the song, where the song rises or falls or the lyrics have some significance, using white flashes and other effects to show the jump between different places, and of course intensifying the coloured lights using grading so as to differentiate where and when different scenes are taking places, amongst other things. Overall I think both aspects of the music video really work well together, and blend together into one coherent video that both shows off the band's performance and tells a story.
A segment from our music video. It shows the narrative transition from 'Singing in the Rain' to 'Sergeant Pepper,' and then the use of the slot machine as part of the 'Sergeant Pepper' narrative. Alongside this there are multiple shots of the band as well as the singer lip-syncing. Click to enlarge.

My Contributions

My contributions to this product include doing the majority of the legwork- I decided what clips would look best when, cut and put in most of the clips, did most of the grading, put in most of the transitions and effects, synced everything up, and so on. I also used my knowledge to create the more visually dynamic pieces of the video- I created the trichromy shots by putting three clips into Photoshop and removing the colour channels from them to create a single composite video clip with 'colour ghosts.' In the previous stages of planning and construction, I worked towards creating these shots, by getting a slot to film footage for them onto our shootboard, and then directing everyone on where and how to stand and move to create the best footage for when I came to create the effect in Photoshop. I also created the explosion animations for the fight scene using Photoshop's animation tools, and more.
A sequence from our music video. It shows the blinking flash transition between the normal band shots and the trichromy shots, some of the different kinds of trichromy shots (longshots and close-ups, for example,) and it also shows the flash transition between the 'Mortal Kombat' narrative and 'Apartment' narrative. Click to enlarge.
The 'Mortal Kombat' fight scene from our music video. You can see the practical effects we used, as well as the explosion animation I created, and even the fast blinking cut effect I used at the end of the shot of me playing the drums. Click to enlarge.

Feedback and Changes

As we progressed through the creation of this product, we developed our ideas and plans for what it should look like. We solidified certain ideas once it became apparent they would work well, and changed others based on our own better ideas as well as feedback.

A good example of this would be the shot when Casey has entered 'Alice in Wonderland' and sees herself in the mirror, revealing her costume has changed. We planned for this shot to be tricky, and actually filmed two versions. We first tried the most visually striking version, in which the camera is zoomed in on Casey's face, and it zooms out revealing it was zoomed in on her reflection in the mirror. However, teachers we showed the video to stated this shot was too dark, even after grading, so we changed to the other version of the shot in which the camera starts at a midshot of Casey in the mirror and tilts around to show a midshot of Casey herself. This shot was a lot nicer looking both before and after the grade, was suitably dynamic through the camera movement, and got a lot better reactions from the audience.
The old, unsuccessful costume transition shot. No matter what we did with grading and other tools, it always looked either too dark or too washed out at the beginning, and we didn't think any of the takes looked particularly good in terms of movement and speed and so on either. Click to enlarge.
The successful costume transition. It is a lot brighter and quicker, and overall better looking than the previous attempt. Click to enlarge.
Another thing we changed, this time based on audience feedback, was the amount of dancing and fun movements we had in the video. After being told to include more of this by some of our target audience, we put more of the 'Singing in the Rain' shots in, as well as more of the relevant 'Sergeant Pepper' shots in. This was before we had reached the end party scene, so we ensured we had enough dancing and movement when we got to that as well. People generally responded well to these changes, with the people who had suggested the changes saying they preferred the new version and others seeing it for the first time saying they liked the energy of the video as well as the video overall.

One very big change we had to make based on both our own realisations after finishing the first draft and looking back at it, as well as feedback from primary audience members such as fellow media students and secondary audience members such as the media staff, was to make the video a lot faster. This consisted of finding certain moments where not much was going on, such as between lines or even between words where Noa wasn't performing a particularly interesting movement, as well as finding certain shots that just seemed slower or that lasted for a second or two without any particular changes. We then put various quick cut-aways into these places, resulting in a new draft purged of slower or less interesting visuals and more full of dynamic visuals.

Our Progress

Overall, I think editing the video was a success. We adapted to new ideas and feedback over the multiple weeks, and I finished the video in time for the deadline. While I think we could have had slightly better lighting at points (I think the 'Sergeant Pepper' and 'Alice in Wonderland' lighting is a bit similar at times, although I fixed this as much as I could with grading and believe it is an issue with how we filmed it,) and we could have used actual cardboard to create animations for the fight scene (I made the Photoshop animation look as much like cardboard as I could, but it was a later addition so we couldn't do anything physically,) everything still came out great, and we tackled every issue we came across and found creative solutions to them. The result is a very interesting video both matching our plans and excelling our collective vision for what it was going to be, and I am very proud of it.

Construction Post 3: Week 3 video and photo shoots

The third week of production was mostly finishing planning for our outdoor promo shots, and then carrying out these plans, all in the span of the one week we had allocated for this. This presented its own set of challenges in comparison to the studio promo shoot- while we no longer had as strict timing for when we could take the photos, we were also no longer using a controlled environment in school. We thus had to plan just as much as with the other promo shots, just for different reasons.

Our Challenges

We had to get permission from our teachers to leave school during a lesson, and then stay out of school through the end of that lesson into some shared free periods which we had scheduled for media use back at the start of the project. Then we had to get permission from the school office in order to leave the premises during school hours. We thus had to make sure we got everything ready quickly and efficiently so we could do everything properly and officially while still having enough time to take a variety of photos. We arrived to school in most of our costume, as the costumes consisted of normal clothes designed to look like something our characters would wear, and I provided the photography equipment as I do it outside of school as a hobby- this meant we had one less thing to organise in school and sign off for, as we didn't have to use any of media's equipment. We then used the area around the school as the location for our first shoot, since we had London streets, a park, and a bus stop to work with just a couple of streets away from school at max. Thus we overcame the challenge of staying on time even with all the extra preparation needed but still getting all the photos we wanted.

Our second challenge was finding a wider variety of photos to get. We decided to use the weekend to go to Whitechapel, an area further into London not too far from any of us, and then take photos with our phones instead of dedicated cameras, to mimic the look of the band going out. This came with its own challenges, such as organising ourselves without in-school meetings, and travelling into London, but we overcame these and reaped the benefits of more photos, which were more candid than our previous pictures, all in a new location, and in the evening too, and we even had the chance to get Tom in some more photos, as he could not attend the previous shoot around the school in Edmonton. Thus we managed to get a very large variety of shots across both shoots in the span of a week.
A candid 'selfie' taken by Noa as Casey with the rest of us acting as our characters too. This kind of shot is important as it further reinforces our band's identity, shows them as real people going out into London like any group of friends might, and includes Tom who up to this point had been slightly underrepresented in the photoshoots. Click to enlarge.

My Contributions

I contributed to this stage of the project as I have done for all stages. I was an actor in all of the shots, both by myself in solo shots and interacting with Noa and Jack (and later Tom) as their characters for further characterisation and interesting promotional shots. I took a lot of the photos, as Noa was in more photos than either me or Jack as she is the main personality of the band, and thus required one of us to be using the camera, and because Noa and Jack were often in photos together as part of their sibling personas, necessitating myself being on the camera. I also provided my own photography equipment for group use as a way of saving some time and effort by bypassing the need to use the media department's equipment. I provided two lenses, and got to learn how to use the second lens which I had only recently acquired- I used it to take some interesting headshots of both Noa and Jack, that were very different than the standard shots and which were unattainable in the studio shoot or with the other lens, and which I learned how to do while out shooting. I of course also helped plan and organise everything.
A shot of Noa and Jack at an Edmonton bus stop, taken by me. We needed a lot of photos like this, as they are important in playing up the relationship between their two characters, and thus I had to take them as the remaining group member. Click to enlarge.
A photo I took of Noa using the second lens I had, with a blurry background effect unachievable with my camera's standard 'kit' lens or in one of the studios. Shots like this are an example of how we pushed ourselves and learned how to experiment with the equipment more when doing our first ever outdoors shoot. Click to enlarge.

Audience Feedback

Our audience told us to get some more candid shots than were possible in the studio- this, combined with teacher advice to get more candid shots that we had already received, lead us to doing the Whitechapel shoot, which was a benefit to us as it provided a lot more and varied material to work with.

We were also told by some target audience members to play up the personality of the front of the band, which for us is the singer. This is one of the things that lead us to taking lots of pictures of Noa acting as Casey, as well as lots of pictures of her interacting with Jack as her character's brother, to further her personality.

Our Progress

Overall I think this week was a success. We expanded on the success of the previous photography week by getting another swathe of images, very different to the last week's images, and different between both of this week's shoots. While we could have found more opportunities in Whitechapel, we still managed to best the darker conditions and take some good nighttime photos to supplement our Edmonton photos. We responded to the unique challenges of each shoot, while adapting based on our own ideas and audience feedback, and obtained a lot of material for the website and, crucially, our band's social medias, where outdoor shots will form the majority of photos posted instead of studio shots. We ended up with a large variety of shots to serve us well in the rest of the project.

Construction Post 2: Week 2 video and photo shoots

Week 2 of production and construction consisted in part of planning for the future weeks of photos and editing, but mainly of planning and then carrying out the photo shoots for our album cover shots, as well as our various studio promotional shots.

Our Challenges

We had the small photography studio set up in the media department available to us some of this week, having to share it with one other group, the third group being in the main studio. The photography studio consisted of a small collapsible white screen, a camera on a tripod, and multiple lights synced up to the camera, with various diffusers and settings available. The first challenge was learning how to use all of this new equipment, which we all tackled very well with the help of the technician- we were proficient in its use quick enough to get all the images we needed.
A picture of me from the studio photoshoot. Note the dark clothing- this is because I have not yet changed into my costume, which is a lot brighter, as we are currently learning and experimenting with the equipment, so we don't run into snags and issues later, speeding up the whole process. Click to enlarge.
The first problem we encountered when shooting commenced was the availability of Tom. While us group members had already marked down when we were all available at the very beginning of the project, Tom wasn't as tied to it as us, and had his own commitments. We thus had to plan around when he was available- this meant we had a lot less time for his shots, but by maximising the time we did have by using all possible slots he was available, we ensured we got lots of images of him and nullified any danger of missing out on key pictures needed for the digipak and also the website.

Another challenge was the limited time we had overall- as we were sharing the studio with another group, and the studio was set up in a media classroom needed for other things unrelated to the music video project, we had limited chances to be in there. This further impacted the problem of finding time for Tom, but even with that out of the way, we had to be very efficient in order to take lots of pictures of all three of us main group members in the estimated two days we had.


My Contributions

My own contributions were similar to that of my fellow group members. I was one of the four people being photographed, and I had to stay in character as Guy Chapman as well as changing costumes so as to ensure some variety. I had to figure out a variety of poses, adapting them based on what feedback I was receiving both from my group while actually shooting and from the audience when getting feedback between shoot sessions. This resulted in me doing some calmer poses to better reflect the professional look the album and website need to have, as well as the more energetic ones I was already doing as part of Guy Chapman's characterisation. Outside of acting, I also took a lot of photos. When I was on camera, I directed the lighting, and also moved it around myself- the directions the lights were pointing had to be adjusted based on what the photos looked like, in order to finally reach the perfect photo. I also did the framing and composition of all the photos I took, working in tandem with the actor I was photographing, whom I directed to get the shots I needed. I took a lot of photos of Noa, Jack, and Tom, many of which ended up in the final products.
A picture of me acting as Guy Chapman for the studio photoshoot. I had to stay in character as with the filming of the music video, and the others took a lot of photos of me as I figured out different ways to show off Guy's personality. Click to enlarge.
A picture of Noa and Jack acting as Casey and Hugh, showing off their characters' sibling relationship. This relationship is very important to the identity of our band, and appears throughout the products- thus it was important to get photos such as these, which were taken by me, as of course both Noa and Jack had to be in the photos, and Tom wasn't a group member and wasn't available much besides. Click to enlarge.

Audience and Teacher Feedback

After talking to our audience, who said some of our more conventional pictures were sometimes a bit boring, we decided we needed more options for the digipak. This ended up being a very good decision, as we ended up using some of the less normal and more dynamic shots when we came to creating the final digipak. 

Another piece of feedback was that we were told by a teacher, who was familiar with the process of taking studio photographs and so on, to look more candid- we facilitated this by having conversations while shooting and having the photographer take pictures at surprising moments. This improved the overall quality of almost all of our shots.

Our Progress

Ultimately the second week was a success. Despite the limited time by the week's end we had a lot of professional-looking studio photos for our album and website. As we went along we faced and overcame many challenges, and implemented many changes, some of which we decided on ourselves, and some of which we received as feedback. While we could possibly have gotten some more full-body shots, overall we still got everything we needed, and to a very high standard as well, to be carried into the next stages of the project and facilitate their success in turn- the next construction stages are a lot harder without quality material to work from.

Construction Post 1: Week 1 video and photo shoots

The first week of construction was the shoot week. It was one of the busiest weeks, for many reasons. One is that it was one of the most physical and hands-on stages of the project, as we had to shoot everything we needed for our video mostly by ourselves in the space of a week. Another is that we had no leeway to continue into the next week because of studio bookings- this meant challenges were intensified because we had to respond to them even more quickly and efficiently than usual, as we had to implement solutions in the same week. We managed to do all of this effectively and the week was a success.

My Contributions

I personally worked well. I assumed every role of production at some point and carried them out effectively- for example, I acted, directed, operated the camera, did the lighting, set up and packed away the studio, did behind-the-scenes work, and much more.
Here is a picture of me preparing to act in the party scene. I am wearing my Mortal Kombat costume while sitting at the drums I play in the video, with a party extra standing behind me. As one fourth of the band, I had two costumes and personas to assume while being filmed over the entire week. Click to enlarge.
A picture of me directing as I give an actor confirmation that their position is correct. Throughout the entire week I took the role of director many times- as Noa had a lot of screentime, and Jack was often in the scene with her playing the part of her character's brother, I directed a lot while they acted. Click to enlarge.
A picture of me operating the camera, zooming in the lens while looking at the monitor. As with directing, I operated the camera a lot out of necessity due to the difference in the number of scenes between myself and other group members at certain points- I often directed and operated the camera at once. Click to enlarge.
A picture of me operating the lighting desk. It was necessary for someone to be in the gallery most of the time, and it was often me who took on this role while my other group members took on different ones- I changed lighting set-ups and varied the intensity and so on, and even used the sound desk when required. Click to enlarge.
A picture of me adjusting one of the lights as part of the studio set up. I also adjusted the lights throughout the day too, if required, and did a lot more behind the scenes jobs to keep everything running smoothly. Click to enlarge.
My solo contributions include lighting, directing, and filming every shot that focused on or only included Jack and Noa, as well as all of Tom's solo shots. I acted in every scene in which Guy Chapman was present, as I played the part of that character, which includes every band shot and all of the 'Mortal Kombat' shots, as well as the pillow fight and party scenes. I ensured I had the track on my phone at all times and often was the one who linked up my mobile to the sound desk in order to play the song so that we could lip-sync or perform to it. I personally took charge of directing the trichromy shots as I had the best understanding of how to get the optimal footage to merge and create effect in the editing stage, having also been the one who came up with the idea for these shots too. I of course also did a fair share of the standard studio work, on top of my specific contributions, some of which are mentioned here.

Our Challenges

Our group faced a fair few challenges unique to ourselves, outside of the general challenge of shooting a music video without much help in a short span of time, which all three groups faced.

The first one was when we had to immediately transition from the test shoot on Friday 3rd November into the first day, and one of the busiest days, of the main shoot on Saturday the 4th. This day was when we almost exclusively filmed the party scene footage, which necessitated organising not just ourselves but also the large group of extras required. We had to teach all of them everything we had learned and planned over the course of the project in a concise manner- this included studio health and safety, what they had to do in the video, and much more. Then of course we had to manage them throughout the day, not just in terms of directing them as actors and so on, but also in terms of keeping them happy as people willing to help us out. We overcame this challenge very well, as we confirmed with some of the actors later while we were collecting audience feedback (the actors are part of our target audience) that they left very happy with the unique experience despite the fairly long working day, and we got all the footage we needed.
We had an extensive group of extras to manage on the very first day of filming, besides having to manage ourselves and Tom and do all the standard work needed for the average shoot day. We did this efficiently and successfully. Click to enlarge.
Another challenge we faced, possibly our largest one, was that a whole morning of footage was corrupted at some point. We planned for this to some degree- on Thursday, we had scheduled a check of our footage, and it was this check which revealed to us that most of Tuesdays footage was corrupted on all of the places it was stored, meaning we had no back-up. We thus had to figure out how to re-shoot a large portion of both the 'Alice in Wonderland' and 'Singing in the Rain' footage, but luckily we had planned back-ups on Friday evening and on Saturday, which we re-planned our shoot schedule around when we found out what had happened. We also collaborated with the media technician, and decided with him that we should have an extra back-up- he thus took our footage and stored it on his computer in the media department on top of the multiple studio back-ups. We never encountered this problem again, and the other two groups who both shot after us also took advantage of this extra back-up.
The relevant page of the shootboard that shows the rescheduling. We took one of the loose pages of shootboard from before we put other copies up onto the walls, and wrote in by hand the new slots for certain shots. As you can see, we have pushed multiple shots from the corrupted set-ups into the previously less busy or even empty back-up days. Click to enlarge.
We also faced various smaller challenges throughout the shoot. One of these included when we had to make the decision on what to do with the cyclorama- the seam between the wall and the floor was visible on camera. We originally planned to keep it visible on account of our DIY homemade aesthetic, but we also wanted to try and eliminate it to see how it would look without a seam on the advice of the media staff. We wanted to explore all routes and did not want to disappoint the staff, so we tried various ways of covering up the seam, including taping paper all along it. This took up a lot of time, which meant we had to be even more efficient with the following shots and even reschedule some. Ultimately we decided we liked it how it was originally, but it was a useful experience in terms of experimenting in the studio and solidifying ideas while shooting, and we managed to both test every possible configuration and ensure we were making the correct decision to produce the best-looking footage, while also not impacting on the amount of shots we could get.

Audience Feedback

We made changes to our shoot throughout, adapting to different situations as well as audience feedback- we got the party scene actors to look at our ideas, as well as some of the non-party shots we filmed that day, to get their feedback, as they are part of our target audience. They suggested we make the lighting for the band shots more pink, so we did. We also got Tom's feedback throughout the week, as he was constantly present due to being an actor, but not part of the planning process- thus, as a target audience member outside of the main group, he was able to guide us, suggesting improvements and choreography for his shots (such as the movements during the 'Sergeant Pepper' set-up he was part of) as well as other areas, such as his idea to improve the handheld shots by standing still and trying to be more stable rather than moving around so much and letting the camera shake get out of hand. 

Our Progress

I think, overall, we made very good progress during this week. While we only focused on the filming part of production, we also got every bit of footage we might ever need for the project. We faced various challenges, but combatted them effectively within the very limited timeframe we had for the shoot.

We managed to develop our ideas on top of the efficient work we were doing, and ultimately had a very successful shoot. Looking back, we could have done more variations on certain shots as part of the experimentation we did- we did various angles for the instrumentalists' solo shots, for example, but not many different angles for the singer outside of the handheld shots- and we could have improved on the 'Sergeant Pepper' lighting somewhat as it ended up being a little bit more similar to the 'Alice in Wonderland' lighting than originally intended, but these reflections only serve as another piece of experience we can carry into the rest of the project, and we still ended up with high-quality, varied, and interesting footage that was a huge boon during editing.

Sunday 26 November 2017

R+P Post 33: Reflections on my role and contribution during Research and Planning

My role in the project was the same as both of my group members- an equal share of the work overall, while excelling in certain specific areas. My learning curve has also been similar to theirs- while I have done filming projects before, and while I have been part of a music video creation project before, I have never undertaken such a large project with just a group to rely on. The previous filming projects didn't fully prepare me for the music video process, including the research into this area, specialised planning, and music video filming style; nor all the extra work such as the album cover and website. The music video project didn't fully prepare me for the shoot, as I didn't have to plan or set-up the shoot last time, and only had to act in it, without really touching the camera or lighting or anything. Thus, as we proceeded with this project in stages, at each stage I utilised my knowledge and experience from similar steps taken in previous projects, while adapting for all the new challenges, and learnt alongside my group as we went along.

As the work we shared equally was still of course of the upmost importance to the success of the project, with each of our contributions to this burden being necessary for this success, I will share some examples of it.
A picture of me when I happened to be the one using the lighting desk. Click to enlarge.
A picture of me directing, while standing next to the camera. Sometimes I, along with the other members of my group, would both direct and operate the camera. Click to enlarge.
A picture of me setting up the camera at the beginning of that day's shoot. Noa can be seen in the background, also setting up. This was another one of the things we shared equally, yet all made an important contribution to. Click to enlarge.
A picture of me operating the camera, changing the focus while monitoring the screen. Click to enlarge.
A picture of me manually adjusting one of the lights from the ground floor of the set, while working with another group member in the lighting gallery. Click to enlarge.
As mentioned earlier, along with all of the regular work I shared equally with my group, such as doing research, making documents, working on all aspects of the shoot, and so on, I also excelled in certain areas, as did my group members. I thus will now leave out the pieces of work I shared equally with my group members, and just focus on those aforementioned specific areas.

During video research and planning, some examples include...
  • I contributed various tracks and influences and so on. One of my song suggestions, Sweet Dream by Black Cat Zoot, became our chosen song. Some of my influences, such as band New Young Pony Club and music video "Ghengis Khan," ended up being important influences on the respective parts of our project.
  • I created the logo for our record label.
  • I had the idea of using trichromy as a special effect in our video.
  • I provided people who proved useful- for example, I did audience research with people such as my cousins, who fit our audience criteria perfectly, and I got my brother to be in the party scene. This also extends to the other research and planning sections.
  • I created various shots which made it into the final cut, such as the one where Casey jumps and the scene transitions with the jump, and the one where the camera is focused on the hands of the keyboard player.
  • I contributed to the choreography of the fight scene, even while performing in it.
  • I contributed to the style and colour scheme of the video, suggesting various ways we could light different set-ups, even creating some moodboards. Some of these ideas made it into the final plans.
During album cover research and planning, some examples include...
  • I provided various useful influences, such as Fantastic Playroom, and noted many useful conventions- I noticed the border around both the California Nights and Talking Dreams album covers, for example.
  • I created the final rough flatplan after suggesting various ideas and influences myself and working with my group to develop all of our ideas.
During website research and planning, some examples include...
  • I suggested useful influences, such as the website of the band Chvrches, and noted useful and influential conventions, such as a pop-up/start screen.
  • I contribtued to the final flatplan with my ideas, some of which made it into the final version.
During pre-production, some examples include...
  • I wrote up a lot of the timeline, especially the end section.
  • I created various stickynote shots for the storyboard.
  • I filled out a lot of the shootboard, especially in terms of the images.
  • I helped create the screen-test.
  • I contributed to the designing of the promo shots.
  • I created the entire Scorpion costume myself, as well as the elaborate parts of the Sergeant Pepper costume. 
A picture of me working on one piece of the Scorpion costume, as some completed pieces lay nearby, along with the completed shirt and epaulets for the Sergeant Pepper costume. Click to enlarge.
  • I provided various pieces of costume, such as Casey's shirt, Guy's entire outfit, Terence's hat, and more.
  • I helped create and paint various cardboard props- for example I did a lot of painting of the slot machine, and I figured out how to create a lamppost around the pole we already had.
  • I provided various props, such as Hugh's guitar, the 'Alice in Wonderland' mirror, and the sofa pillows.
  • I helped to create various lighting set-ups, as well as organise the sets.
A picture of me saving a lighting set-up I had just worked on, still in my band costume from performing earlier on. Click to enlarge.
During production, some examples include...
  • I performed in a key role as Guy Chapman, a member of the band.
A picture of me as Guy Chapman, getting ready to continue performing. Click to enlarge.
A picture of me in my Scorpion costume, preparing for the fight scene I performed in after having helped choreograph it. Click to enlarge.
  • I took the lead when filming the trichromy shots so that we would have footage we could use to get the effect.
  • I worked on certain shots alone because of how the schedule worked- a lot of the solo shots of Tom performing as Terence, for example, were set up and filmed and directed and so on by me alone, as Noa and Jack had to be elsewhere.
Overall, without the sharing of the burden between each of us in terms of the regular work, as well as the various different areas we all excelled in (some of mine are mentioned here, but Jack and Noa of course had their own,) we would not have been as successful in this period of the project. I think I learnt a lot as I went along, performed my roles well, and made a very strong contribution to the project.